Eurodyne Powertap Air is a device that works in conjunction with the Eurodyne Powertap app for iOS. It allows users of supported vehicles to perform a variety of tasks like flashing, datalogging, diagnostics and changing adjustable settings from their smartphone, without the need for a PC. See the table below for the supported models and features.

2015 – 2019 VW Golf R, GTI, Audi S3 and A3 2.0T

Flashing stage files from the Eurodyne server

Read and write adjustable settings (Boost limit, octane and E85 if enabled)

-High speed datalogging with ability to send logs by text or e-mail

-Read and clear fault codes

Flashing Maestro files saved to Powertap (60+ file capacity)

2010 – 2016 Audi S4 (B8 and B8.5)

Flashing stage files from the Eurodyne server

-High speed datalogging with ability to send logs by text or e-mail

-Read and clear fault codes

Flashing Maestro files saved to Powertap (60+ file capacity)

Other models may be supported in the future.

Existing customers with supported vehicles who want the new bluetooth device can purchase one for 249 USD in our webstore. These will ship without credits.

This device is will work on all models if used with the Eurodyne flash Windows software (with a USB connection) as well. It replaces the old USB only Powertap device.

You MUST read and understand all the instructions for your model before proceeding.
If you do not understand one of the steps, e-mail support@eurodyne.ca and we will explain that step.

This FAQ entry will outline the process of licensing a new vehicle for use with the Maestro tuning suite. Maestro is a software package that allows end users or tuners to access and edit relevant maps and other settings in the ECU.

First you will need enough credits to perform the flash. VW and Audi vehicles require 8 credits for a Maestro license. A new Maestro cable will ship with the 8 required credits. If you already have Eurodyne software on your ecu, the Maestro license may require less credits depending on the model. You can check to see how many credits are required using the software. Once a vehicle is licensed, you will be able to flash it as often as required at no extra cost. You can purchase credits through the Eurodyne website, or through the flash program itself. You will need your cable number to purchase credits, and you will need to be connected to the internet. You can get your cable number using the Eurodyne flash software (it is an option under the flash cable menu) you need to have the cable plugged into the PC to get the cable number (it does not need to be plugged into the vehicle to get the cable number.)
******Procedure for 1999 – 2005 models******

*******DO NOT FLASH YOUR ECU FROM THE SERVER, you must use the Maestro base files available in the Maestro editor only on these ecu’s ********

The first step on these models is to read your ecu and send us the read. This will ensure you use the correct base file for your ecu type, and validate the communications on the vehicle. To do this, click “Start here” the “Read my ecu”. Once the read completes, e-mail us the read file, it should save to the c:\Eurodyne folder on your PC. If you have trouble reading the ecu, try a lower communication speed, you can set this under the flash options and com speed menu. Wait to hear back from us after we verify the read.

Prepare the base file you plan to flash to the vehicle by opening the Maestro editor, then selecting and opening the base file you want to use under the file menu.
You will need to be connected to the internet to do this, as the base files are downloaded from the Eurodyne server.

Save this base file to your computer.

Next, open Eurodyne flash, and click on “start here” then “License new vehicle for use with Maestro.”

You will be asked to confirm you want to use the credits to license the new vehicle.
Click yes, then select the base file you saved earlier.

You may get a message asking if you want to bypass the immobilizer. This is for ME7 ecu’s only, and is only neccessary if you are using an ecu from another vehicle, and the immobiliser is active.

In any other case, click “no,” – the flash should complete in less than 10 minutes, and the vehicle will be licensed from that point on, and can be flashed any number of times after this.

******Procedure for newer cars (2006 +)******

*******DO NOT FLASH YOUR ECU FROM THE SERVER UNTIL YOU HAVE LICENSED IT FOR MAESTRO********

Below is a general outline based on year model and ecu type. If you are not sure about something, do not “try” anything to see if it works, or experiment. This is a good way to end up with a non functional ecu. Contact support@eurodyne.ca and we will assist by e-mail.

On the newer cars we have changed our system for several reasons, and now the Eurodyne flash software is used to display and download Maestro base files.

The first step is to license your vehicle and VIN. Once you have done this, you will be able to flash the ecu as many times as neccessary with any of the available files. You will need an internet connection for this procedure. Connect the cable to the car and PC, and then click “Start here” and then “License new vehicle for use with Maestro.” The software will license your ecu and VIN for use with Maestro.

On cars with MED17 and Simos ecu’s, the next step is to “unlock” the ecu for port flashing with Maestro files. This is accomplished by loading Stage 1 or 2 software from the server. The software should prompt you to do this. If in doubt, contact support@eurodyne.ca and we will confirm.

After this, you can click “Check available Maestro files” to see which Maestro files are available for your particular vehicle. You can then download and save the file to you PC for editing and uploading to your ecu. To edit the file, download the Maestro editor software from the Eurodyne website and open the file you had saved earlier in the editor.

For users with MED17 or Simos ecu’s, if you ever flash your ecu back to stock, you will need to unlock the ecu by flashing the stage 1 or 2 file file from the server before loading a Maestro base file, or you will have a no-start condition.
** We are unable to provide remote tuning, tuning advice, or review datalogs. If you need help with this, you should contact a tuner or tuning shop and work with them.**

If you have trouble directly related to flashing, licensing or reading an ecu, contact support@eurodyne.ca and we will assist by e-mail.

Business hours are 8 – 5 Monday to Friday, Eastern time.

User adjustable launch control (2-step) and no lift shift features are now available to our customers for the 2.0T MQB engines.

At the moment, North American MK7 GTI, Golf R, Audi S3 and A3 2.0T engine box codes are supported.

The ecu must be licensed for use with Maestro in order to access these features. See the FAQ for details on this.

In order to use these features, you must first flash your ecu with one of the LC/NLS enabled “loader” files. These files are available in the bottom section of the file download window, in the “for Maestro users” section. Click “show loader files” to access them. Once you have flashed the loader file, you can access the various settings by downloading one of the LC/NLS Maestro base files and opening the file in the Maestro editor.

Launch RPM settings can be adjusted quickly using the accelerator and brake pedals, without the need for reflashing.

On vehicles equipped with a DSG transmission, the DSG launch limits will override the launch limits set in the ecu, so you need our stage 3 DSG software that removes the DSG launch control in order for the ECU based launch control to work correctly.

Here is an explanation of the features;

Launch control:

Operation

Launch control RPM is controlled via torque control, (as with DSG controlled), fuel cut, or spark cut, configured using launch_control_config setting in Maestro.

When using torque control, the stationary RPM limit is used to control launch RPM. This method will be smooth, just like stock, but will close the throttle.

When using fuel cut, the control will be rough, with the engine rev’s oscillating, but will keep the throttle fully open. Fuel cut is handled using the standard ECU strategy, the control just indicates to the fuel cut function that all cylinders need to be cut. Spark cut will cut spark but not injectors.

Activate on MT:

– ESP fully disabled

– Clutch depressed

– Parking brake is not engaged

Once the clutch pedal is released or vehicle speed is greater than the Max vehicle speed for launch control setting in Maestro,  launch RPM control will no longer be active.

Activate on DSG:

– ESP fully disabled

– Brake pedal depressed

– Selector lever in D/S/Tip

– Parking brake is not engaged

The conditions for launch on DSG apply, so car should be in sport and brake pedal sufficiently depressed, etc.

Once the brake is released or vehicle speed is greater than the Max vehicle speed for launch control setting in Maestro, launch RPM control will no longer be active.

Adjustment

Adjustment can be made with the accelerator pedal and brake pedal.

When using the pedals to adjust:

Activate on MT:

– Engine running

– Parking brake engaged

– Transmission in neutral

– Clutch pedal not depressed

Activate on DSG:

– Engine running

– Parking brake engaged

– Selector lever in P

Pedal adjustment operation:

– Use the accelerator pedal to rev to the desired RPM

– When desired RPM is reached, tap the brake

– The MIL will flash twice indicating that the adjustment has been stored

– Release the accelerator pedal

Make sure the stationary rev limit set high enough in Maestro to not limit RPM adjustment during pedal based adjustment.

NLS:

NLS will use fuel cut or spark cut depending on config in Maestro to control engine RPM during shifts. When activated the system will take the current engine RPM, subtract NLS RPM offset, and control to this RPM until deactivated.

Fuel cut is handled using the standard ECU strategy, the control just indicates to the fuel cut function that all cylinders need to be cut.

Activated on MT:

– Accelerator pedal is greater than Minimum accel pedal for NLS

– Vehicle speed is greater than Minimum vehicle speed for NLS

– Clutch depressed

Once the clutch is released, NLS control will stop.
If you have problems running any of the Eurodyne PC software with windows 8, here are 2 things you can check;

You will need to enable the .NET framework, as this is not enabled by default on all versions of windows 8 and 10.

http://msdn.microsoft.com/en-us/library/hh506443.aspx

Also, in some cases you may need to run the software in compatibility mode.

The compatibility mode that has worked for 100% of cases to date is “compatibility mode for windows XP service pack 3”

Right click on the program icon, and in the drop down menu that appears,  click on “properties”

Click on the compatibility tab, check the “Run this program in compatibility mode for:”  box, and select “windows XP service pack 3” from the drop down.

Finally, click “Apply” at the bottom right.

You can purchase credits through the Eurodyne flash program, under the “Credits” menu.

You can also purchase them directly from this link, (you will need to enter your cable number manually in this case);

(copy and paste into your browser)

https://www.eurodyne.ca/shop/audi/flash-credits/

In either case, make sure you click the “return to Eurodyne website” link after paying for the credits if your browser does not do it automatically.

You can get your cable number by clicking “get cable ID” under the flash cable menu in the Eurodyne flash software.

The cable must be plugged into the PC while doing this.

The 2-Step feature of Maestro is now available for the following engine codes/models:

  • AWP-AWW (2001-2005 golf jetta 1.8T)
  • AMB (2003-2005 Audi A4 1.8T)
  • AWM(2001 Audi A4 1.8T)
  • APB (2000 to 2005) 2.7T

Disclaimer – The 2-step launch control system should only be used with a complete understanding of how it functions and the potential hazards of use.

The 2-step launch control works by cutting ignition momentarily and allowing
the injectors to continue injecting fuel. The unburned fuel will ignite in the
manifold and exhaust system allowing the turbo to build pressure while the
vehicle is stationary. The extreme temperatures from this can overheat and
damage components of your exhaust system (turbo, catalytic converter etc…) if
used for too long. For this reason we recommend that the 2- Step only be used
in off-road vehicle applications.

Activating the 2 Step and no Lift Shift features requires that you first
activate this feature using Maestro 7 and the following procedure.

  1. Plug in your Powertap interface and launch the Maestro 7 software
    program – update if you are instructed to do so
  2. Using the file menu open your current tune file
  3. Select the 2 step and no lift shift feature (towards the bottom
    of the menu choices) this will open a feature selection screen
  4. Select 2 step and no lift active and save the file to a new name

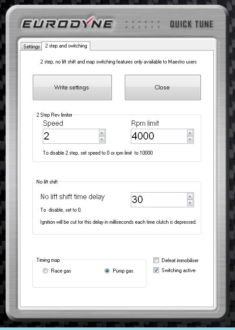
Image of Eurodyne 2 step Once 2 step has been set to active you must flash the new file to the car and then enter the desired operating parameters.

  1. Open Eurodyne Flash client and select flash ECU and select the file saved in the operation above
  2. Once the file has been successfully written to your ECU select the “Quicktune and other settings” option found in the “Other functions” drop down menu
  3. Select the 2 step and switching option tab
  4. Set the “Speed” option – this will establish the road speed in KPH for 2 step deactivation – a setting of 2 will cause the 2 step to be active below 2 KPH and limit RPM to the level set in the RPM limit box (see next step). A setting of 0 turns 2 step off
  5. Set “RPM limit” this establishes is maximum engine speed with 2 step active (vehicle speed below threshold set above)
  6. Enter desired “No lift shift” value (allows driver to upshift with the accelerator pedal fully depressed by deactivating the ignition circuit to limit RPM for the time delay entered in milliseconds – once time delay has expired normal engine operation will resume)
  7. Select the write setting button to save the values you have entered

This is a summary of the Powertap air iOS app functions. We will follow up with a video showing the app in action.

Flash ECU from server

This selction will get the ECU info from your vehicle, and then display a list of compatible stage files from our server on your phone. Click select file to flash your ecu with the selected file after chosing.

Flash ECU from Powertap

This selection is for Maestro users who have stored different tuned files on their Powertap air. This allows you to switch between the files stored on your device quickly.

Log data

This selection will open the datalogger section of the app. This view also gives you a nice display of default parameters like boost and RPM gauges, along with a scrollable table view of other parameters. You can use the defaults, or select them yourself by clicking the select variables button at the bottom.

If you toggle “log to file”, the app will log data to a .csv file. if you toggle the same switch again, the app will prompt you to send the datalog file by text message or e-mail.

Adjustable settings

This will read the adjustable settings from your ecu if it has been flashed with a file that has adjustable settings enabled. Files with adjustable features will have the word “Adjustable” in the file name when you chose a file to flash from the server. Not all models support these features. Set the boost limit and octane setting to your chosen value, then click “Write settings” and the settings will be written to your ECU.

Check fault codes

Scans the engine ECU for fault codes, and displays a description.

Clear fault codes

Clears fault codes in the engine ECU.

License new vehicle for Maestro

Clicking this will license the current vehicle and VIN for use with Maestro if you have sufficient credits available.

Get credit count

This will display the current number of available credits for the Powertap in use.

Configure Wifi

The Powertap can transfer files between our server and the device by Bluetooth or Wifi. In order to transfer files from our servers to the Powertap by Wifi, the device must be connected to your local Wifi network. If you want to use Wifi for file transfer, click “Configure wifi” enter the Wifi password for the network, and save it to the device by clicking “Save Wifi info”. Wifi is quicker than bluetooth, but you need to set up the network to use it.

Format drive

This will format the file storage on the Powertap device. It will also erase any tuned files stored on the device. You should not need to use this feature in normal operation, use it if you are having trouble saving files to the device.

Show settings

In order to connect to our servers, you must enter the e-mail and password associated with your Eurodyne account here, and save the credentials by clicking “Save settings”.  If you do not have an account, you can create one on the Eurodyne website.

This page also allows you to chose between Wifi and Bluetooth as the download method for sending files to the Powertap device. Wifi is generally quicker for file transfers, but bluetooth can be easier because it uses your phone’s internet connection to connect to our servers.

Get last error from device

This will display the last error message stored on the device. While downloading files over Wifi, the device is not connected to your phone, so this can be helpful for troubleshooting Wifi connection problems.

Get powertap firmware version

This will display the current firmware version your powertap is running.

Update device firmware

This allows you to update the firmware on your powertap device, over the air. Only do this after consulting Eurodyne support – support@eurodyne.ca.

Get ECU info

This will retrieve the ECU info from the vehicle you are connected to.

Still have a question? Contact us here. Your email address will not be published. Required fields are marked (*)